
Creating music in a home studio can be incredibly rewarding, but it also comes with its unique challenges. One of the most significant hurdles is maintaining high sound quality amidst the myriad of noises that can seep into your recordings. From the hum of household appliances to the distant rumble of traffic, unwanted sounds can seriously impact your work.
Noise control isn’t just about silencing these disturbances; it’s about creating an environment where your music can shine. A well-controlled acoustic space allows for clearer recordings, more accurate mixing, and ultimately, a more professional sound. Whether you’re a seasoned producer or a budding musician, understanding and implementing noise control measures is crucial.
In this blog post, we will explore practical solutions to help you reduce unwanted noise in your home studio. From identifying common noise sources to applying effective soundproofing techniques, we will guide you through the process of transforming your recording space. For more tips on improving audio quality, check out our comprehensive guide on how to improve the audio quality of your home studio.
So, let’s dive in and discover how to achieve a quiet and productive home studio environment.
Understanding the Sources of Noise
Before tackling noise control in your home studio, it’s crucial to identify the common sources of noise that can disrupt your recordings. By understanding where these sounds originate, you can implement more targeted and effective noise reduction strategies.
Household appliances are frequent culprits. The hum of a refrigerator, the whir of a ceiling fan, or the buzz of a computer can all seep into your recordings. Even seemingly insignificant sounds, like a ticking clock or a running dishwasher, can be picked up by sensitive microphones.
Outside traffic is another major source of noise. Cars passing by, distant sirens, or even the chatter of pedestrians can create unwanted background noise. If your studio is near a busy street, these sounds can be particularly challenging to eliminate.
HVAC systems, while essential for maintaining a comfortable environment, can also contribute to noise pollution. The constant hum of air conditioners, heaters, or ventilation systems can interfere with your recordings, especially during quieter passages.
Additionally, structural noises from within the building, such as footsteps, plumbing, or creaking floors, can find their way into your studio. These noises are often amplified in older buildings with less soundproofing.
Understanding these noise sources is the first step towards creating a quieter studio environment. Once you’ve identified the specific noises affecting your recordings, you can start applying the appropriate noise control measures. This foundational knowledge will be invaluable as we move forward to explore practical solutions for reducing these disturbances. For more tips on improving your setup, check out our article on recording high-quality audio on a laptop.
Soundproofing Techniques for Home Studios
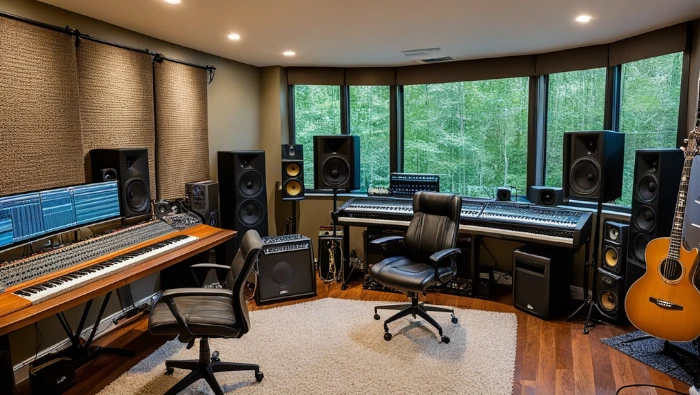
Effectively soundproofing your home studio is essential to minimize external noise and prevent sound leakage. By using the right materials and techniques, you can create a controlled acoustic environment conducive to high-quality music production.
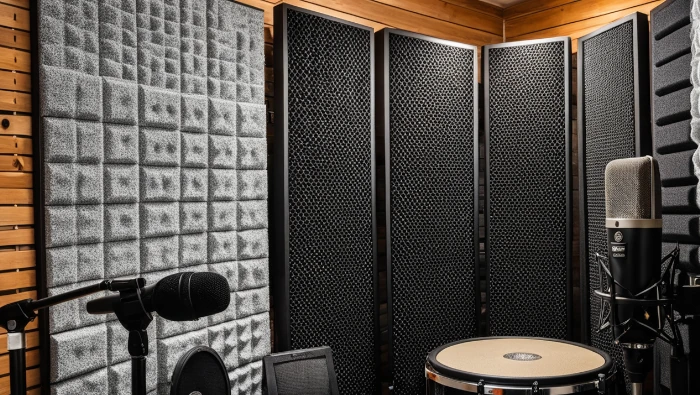
1. Acoustic Panels: Acoustic panels are a popular and effective soundproofing solution. Made from dense, absorbent materials, they can be mounted on walls to reduce echo and absorb unwanted sound waves. Position them strategically around your studio, focusing on areas where sound reflection is most problematic.
2. Bass Traps: Bass traps are designed to absorb low-frequency sound waves that can cause muddy recordings. Placing bass traps in the corners of your studio will help manage these low-end frequencies, resulting in a cleaner and more balanced sound.
3. Soundproof Curtains: Heavy, soundproof curtains can help block noise from outside sources, such as traffic or neighbors. Hang them over windows and doors to create an additional barrier against external noise. For more information on choosing the best soundproof curtains, check out this comprehensive guide.
4. Door Seals and Sweeps: Gaps around doors are a common entry point for noise. Install door seals and sweeps to close these gaps and prevent sound from leaking in or out of your studio. This simple, cost-effective measure can make a significant difference.
5. Floor Underlayment: If your studio is on an upper floor, consider adding soundproof underlayment beneath your flooring. This can help reduce impact noise from footsteps and vibrations, ensuring a quieter environment.
6. DIY Soundproofing Solutions: For those on a budget, there are plenty of DIY soundproofing options. Thick blankets or rugs on walls and floors can help absorb sound. Even bookcases filled with books can serve as impromptu acoustic panels.
By implementing these soundproofing techniques, you can significantly reduce unwanted noise in your home studio. This creates a more controlled environment where your music can be recorded with clarity and precision. For a deeper dive into acoustic treatment, visit our post on acoustic insulation for home studios.
Acoustic Treatment for Optimal Sound Quality
While soundproofing aims to block external noise, acoustic treatment focuses on enhancing the sound quality within your studio. Proper acoustic treatment ensures that your recordings are clear, balanced, and free from unwanted reflections or echoes.
1. Understanding Acoustic Treatment: Acoustic treatment involves managing sound reflections within your studio. Unlike soundproofing, which blocks external noise, acoustic treatment optimizes the internal acoustics to ensure a clear and accurate sound.
2. Acoustic Panels and Foam: Acoustic panels and foam are essential tools for managing sound reflections. Place them on walls and ceilings to absorb mid to high frequencies, reducing echo and reverb. This helps create a more neutral sound environment, crucial for accurate monitoring and mixing.
3. Diffusers: Diffusers scatter sound waves, preventing them from bouncing directly back to the listener. By breaking up these reflections, diffusers help create a more natural and balanced sound. Position them on walls or ceilings where sound tends to reflect the most.
4. Bass Traps: As mentioned earlier, bass traps are vital for managing low-frequency sounds. Install them in corners where bass buildup is most significant. This helps to prevent boomy or muddy recordings, ensuring a tighter and more controlled low end.
5. Reflection Filters: For vocal recordings, consider using a reflection filter. These portable devices surround the microphone and help absorb sound reflections, resulting in cleaner and more focused recordings.
6. DIY Acoustic Treatment: On a tight budget? Try DIY acoustic treatment solutions. Thick curtains, carpets, and upholstered furniture can help absorb sound. Even strategically placing bookshelves or large canvas paintings can make a noticeable difference.
By combining soundproofing with effective acoustic treatment, you can create an optimal recording environment in your home studio. This ensures that your recordings are of the highest quality, free from unwanted noise and reflections. For more insights, see our guide on setting up a basic home studio.
Noise Reduction Strategies and Tools
Beyond soundproofing and acoustic treatment, there are additional strategies and tools that can help you maintain a quiet and efficient home studio. Implementing these practical solutions will further reduce unwanted noise, allowing you to focus on creating great music.
1. Rearranging Furniture: Strategically arranging furniture can help minimize noise. Use bookshelves, sofas, and other heavy pieces to create barriers that absorb sound. Placing these items against walls can help block external noise from entering your studio.
2. Sealing Gaps: Small gaps around windows, doors, and vents can let in significant amounts of noise. Use weatherstripping or caulk to seal these gaps. Door sweeps are also effective for closing the gap at the bottom of doors.
3. White Noise Machines: White noise machines can mask unwanted sounds by producing a consistent background noise. This can be particularly useful during quieter recording sessions where even minor disturbances can be disruptive.
4. Isolation Pads: Isolation pads are essential for reducing vibrations from studio monitors and other equipment. Place these pads under your monitors, keyboards, and other gear to prevent vibrations from traveling through the floor and walls.
5. Vocal Booths: If you primarily record vocals, consider investing in a vocal booth. These enclosed spaces are designed to isolate the singer from external noise and reflections, ensuring a clean recording. Portable vocal booths are available for those with limited space.
6. Expert Tips: Consulting with audio professionals can provide valuable insights into noise reduction. They can offer tailored advice based on your specific studio setup and help you implement effective solutions that you might not have considered.
By applying these noise reduction strategies and utilizing specialized tools, you can achieve a quieter, more controlled home studio environment. This ensures that your recordings are clear and free from unwanted noise, allowing you to produce high-quality music. For more guidance on optimizing your studio, read our article on common home studio recording mistakes.
Conclusion: Achieving a Quiet and Productive Home Studio
Creating a noise-free home studio is essential for producing professional-quality music. By understanding the sources of noise and implementing effective soundproofing techniques, you can significantly reduce external disturbances. Complementing these efforts with acoustic treatment enhances the internal sound quality, ensuring your recordings are clear and balanced.
In addition to these foundational measures, adopting practical noise reduction strategies and tools will further optimize your studio environment. Simple actions like rearranging furniture, sealing gaps, and using isolation pads can make a big difference. Investing in items like white noise machines and vocal booths can also enhance your setup.
By taking these steps, you can transform your home studio into a quiet and productive space. This allows you to focus on your creative process without being distracted by unwanted noise. High-quality music production starts with a controlled acoustic environment, and with the right approach, your home studio can meet professional standards.
Embrace these noise control measures and enjoy the benefits of a quieter, more efficient home studio. Your recordings will reflect the improved sound quality, and your overall production experience will be more enjoyable and productive. Now, it’s time to implement these tips and elevate your home studio to the next level! For further advice on home studio setups, check out our post on how to buy home studio equipment while spending less.